IP (CCTV) Camera Setup
Using one or more IP cameras connected via a network allows for alternative camera placement strategies and reuse of already existing CCTV cameras.
When setting up audience analytics using IP cameras, several factors affect the outcome, both in positive and negative ways:
-
Network: A wired network is almost always preferred to wireless ones (which introduce latency and connection issues), though already overcrowded or small-bandwidth networks can degrade the received video stream.
-
Camera features: Especially reusing aging CCTV setups with barely enough power and unmaintained camera software can be its own hell.
-
Video quality and encoding: Finding an equilibrium between picture size and frame rate and bandwidth requirements.
-
Video delivery protocol: Most cameras provide RTSP or HTTP video streams over the network.
Process
For the Vision Node, you'll end up with one or more URLs, one for each video source, of the form
protocol://IP-or-host-address:port/path?option=value.
- Determine the number of cameras and other devices sharing the network.
- Determine a target resolution and frame rate for each camera individually.
- For example, if using age/gender estimation, check that a centered individual's face is clear enough, and more than a decent pixel size (e.g. more than 64x64 pixels).
- Frame rate does not need to be very large. 10-15 fps can be enough if the rate is steady and the picture clean.
- You can then tune the video parameters to match the available bandwidth.
Accessing each camera
- Determine the brand and model of the camera.
- We will use Hikvision screenshots as an example. Your camera might be different.
- Determine the IP address of the camera.
- If set up from scratch, check the user manual for the default IP.
- Log into the administrative interface (usually via a browser, using
http://ip.of.the.cam, though some cameras have their own configuration software).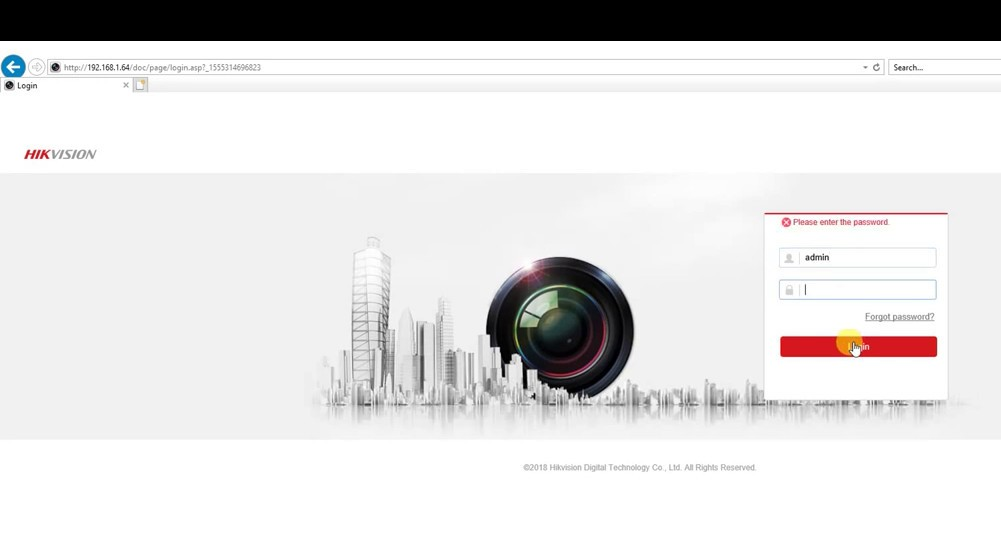
- Check that you can see the video clearly.
- Some cameras will make you install a browser decoding plugin to view the video.
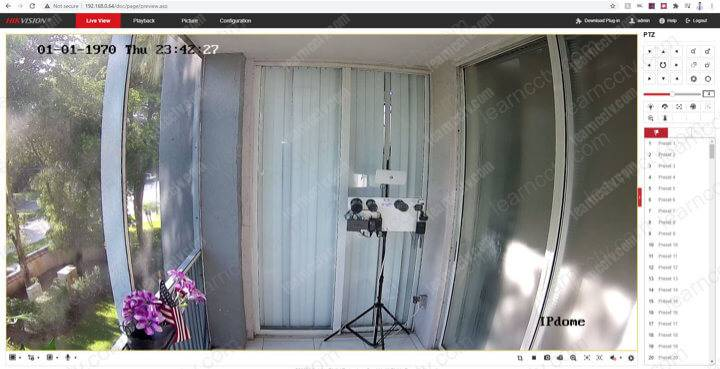
- Some cameras will make you install a browser decoding plugin to view the video.
- Access the video settings (Settings > Video or similar).
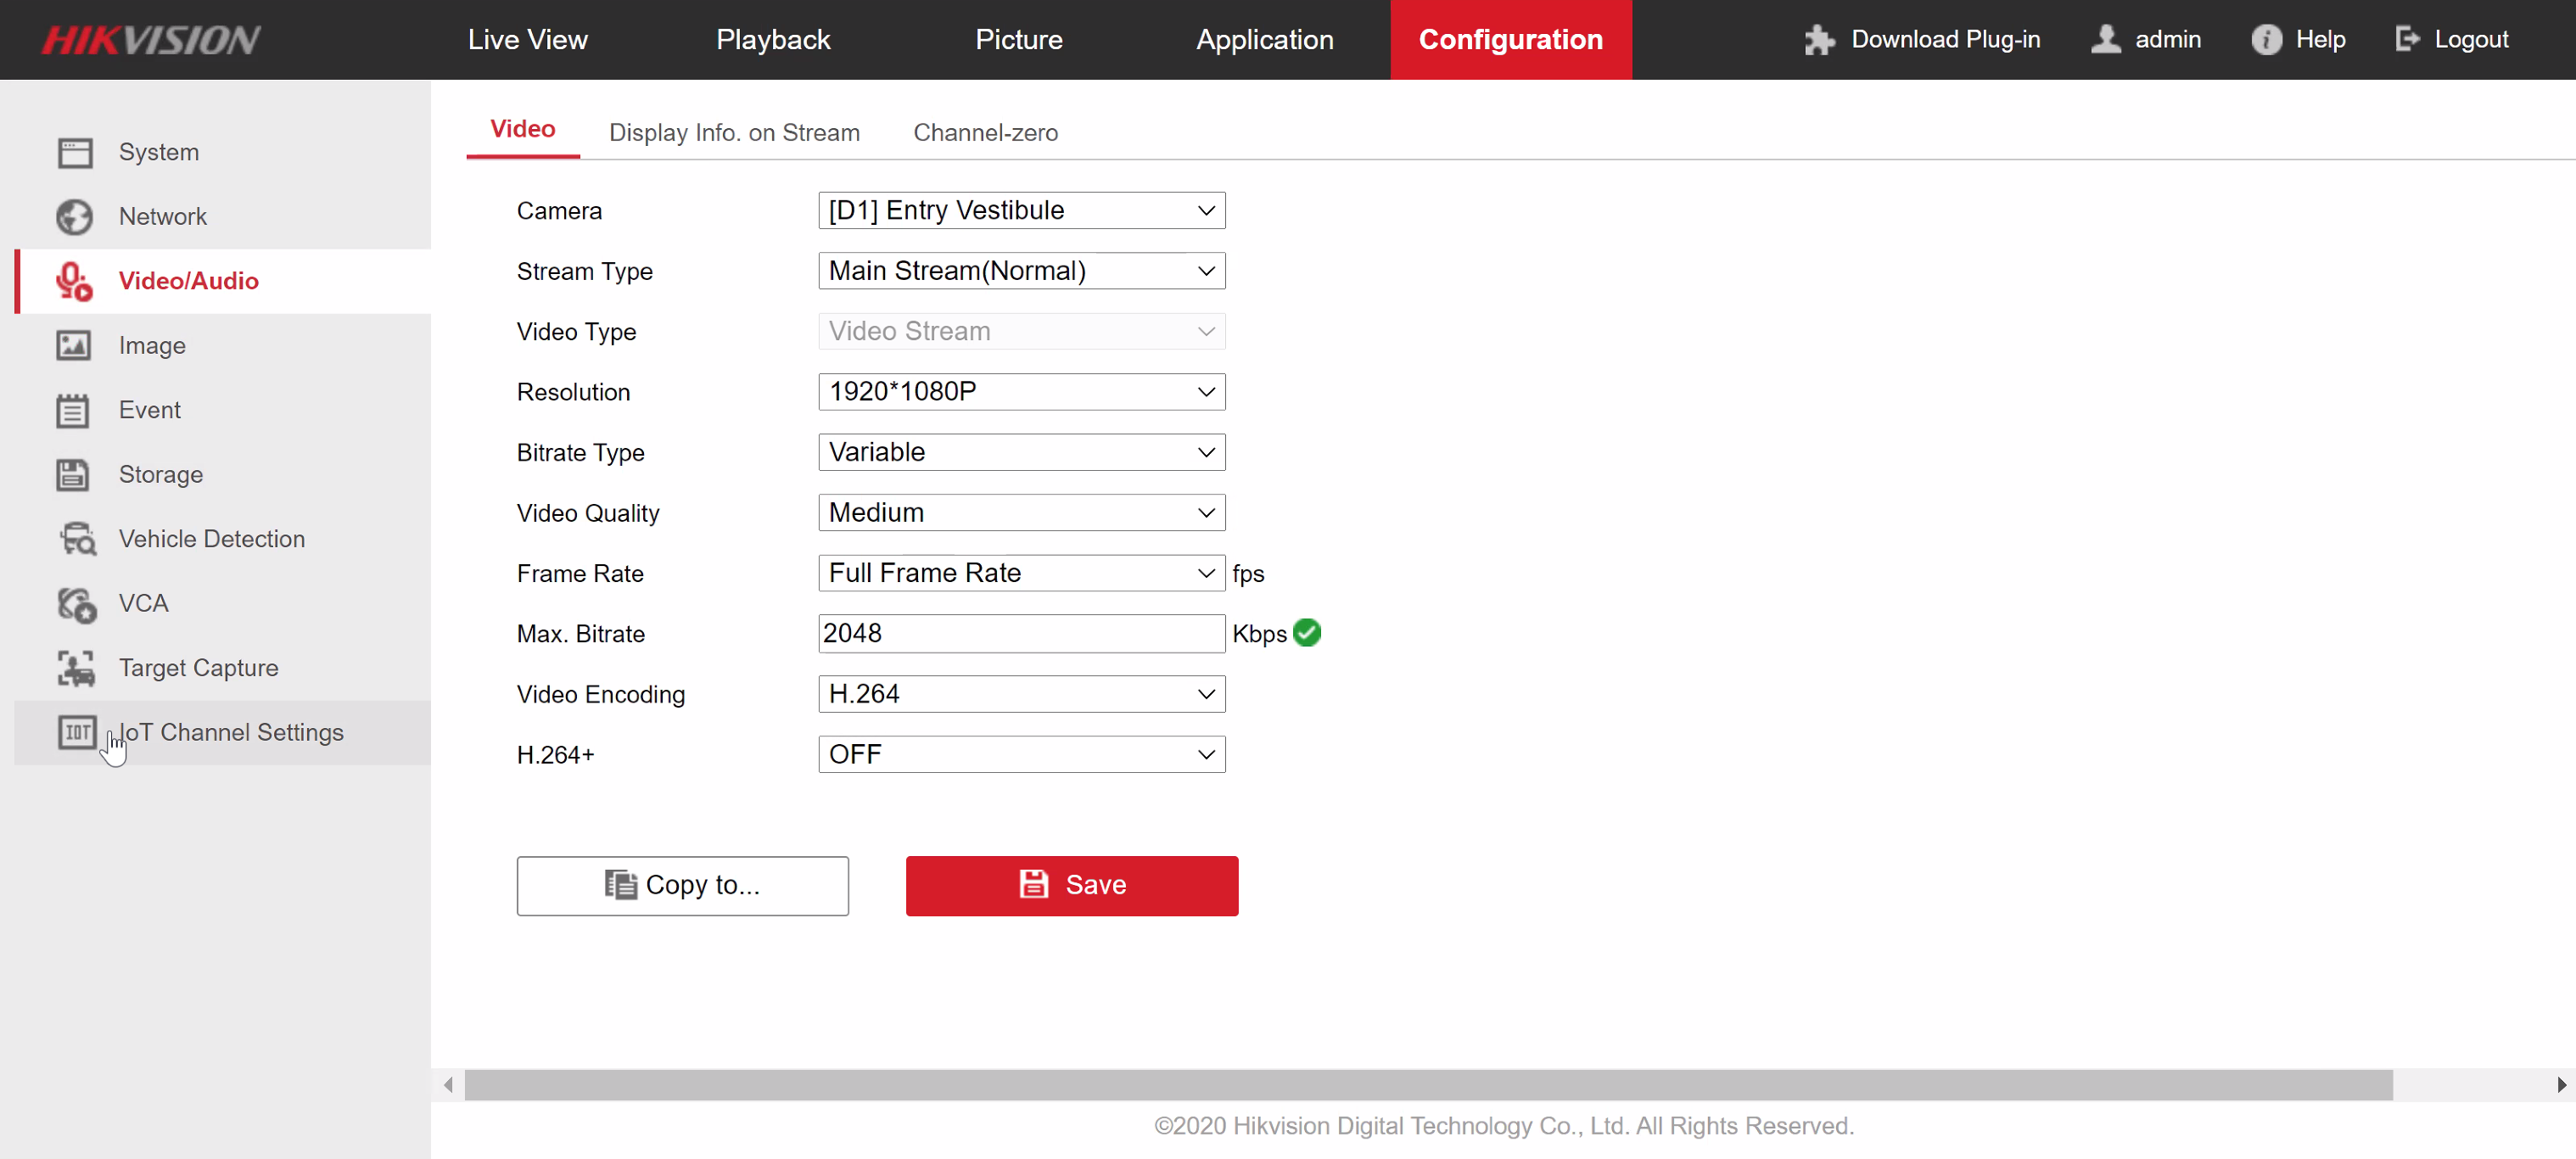
- Check the network settings.
- Ensure that RTSP protocol serving is enabled (if you are not using MJPEG) and using port 554 (or take note if the port is different).
- Ensure that at least a Main Stream is configured
- If the Main Stream is already being used for e.g. security monitoring, you can use a Sub Stream for audience
analytics.
- Note though that the Sub Stream might not support the same size/features as the Main Stream.
Main Stream Recommended Settings
- Encoding: H.264 Main Profile
- Resolution: 1280x720 or 1920x1080
- Bitrate: 3000 kbps CBR (Constant Bit Rate)
- Frame rate: 15 fps
- GOP: 2 seconds
In case of using a Sub Stream, ensure that the same minimum requirements are met ( see here).
RTSP URL
RTSP is usually served over TCP port 554 of the camera. The basic form of a RTSP URL is:
rtsp://[username]:[password]@[camera_ip_address]:[port]/[stream_path]
Every manufacturer adds its own extra parameters depending on make, model and/or firmware version. Some examples:
| Camera Brand | Common RTSP URL Format |
|---|---|
| Hikvision / HiLook | rtsp://[username]:[password]@[ip]:554/Streaming/Channels/[ChannelID]01 (Main Stream)rtsp://[username]:[password]@[ip]:554/Streaming/Channels/[ChannelID]02 (Sub Stream) |
| Dahua | rtsp://[username]:[password]@[ip]:554/cam/realmonitor?channel=[ChannelID]&subtype=0 (Main Stream)rtsp://[username]:[password]@[ip]:554/cam/realmonitor?channel=[ChannelID]&subtype=1 (Sub Stream) |
| Reolink | rtsp://[username]:[password]@[ip]:554/h264_stream (Main Stream)rtsp://[username]:[password]@[ip]:554/h264_sub_stream (Sub Stream) |
| TP-Link Tapo | rtsp://[username]:[password]@[ip]:554/stream1 (Main Stream)rtsp://[username]:[password]@[ip]:554/stream2 (Sub Stream) |
| Amcrest / Foscam | rtsp://[username]:[password]@[ip]:554/cam/realmonitor?channel=1&subtype=0 |
If you have the brand and model, a quick google for "
Note: If for some reason you have to use MJPEG, the same method applies.
Checking the URL
The primary test to check the URL works is using VideoLAN VLC Media Player.
- Install and open VLC media player on your device.
- In the main menu, select "Media" and then "Open Network Stream."
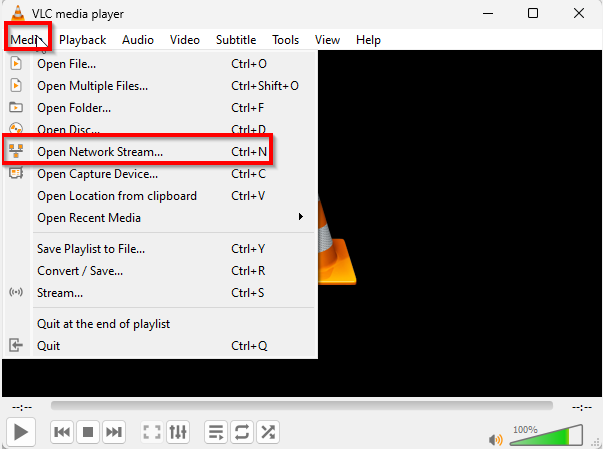
- A window will appear with a text field where you can input the stream URL.
- Paste the RTSP URL you copied in the previous step into the text field under the "Network" section in VLC.
- Click "Play" to start streaming. If the URL is valid and your camera is properly configured, you should see the live stream in VLC.
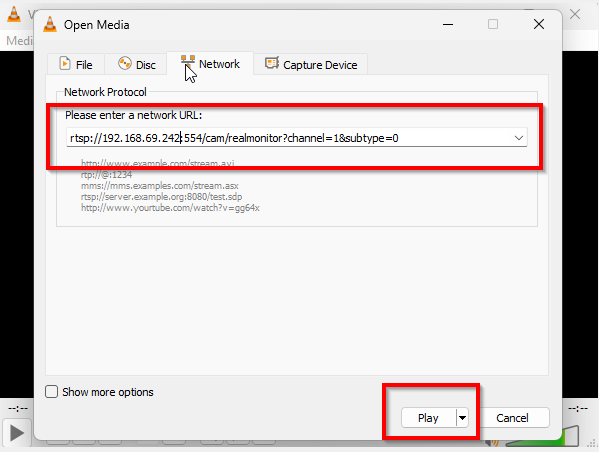
If the stream doesn’t start, check the camera configuration, the network, and make sure the URL is correctly entered.
Common issues
- Wrong username or password. VLC may report
401 Unauthorized,RTSP authentication failed, orVLC is unable to open the MRL. - Special characters in credentials. Characters such as
@,#,&, or/must be URL-encoded. For example,@becomes%40. - Wrong RTSP path. VLC may report
404 Not Found,454 Session Not Found, orVLC is unable to open the MRL. - Wrong or blocked RTSP port. VLC may report
Connection failed,Connection timed out, orConnection refused. - Camera unreachable. VLC may report
Network unreachable,Host unreachable, orConnection timed out. - RTSP disabled on the camera. VLC may report
Connection refusedor fail to open the stream. - Unsupported codec. VLC may connect but show a black screen or codec-related errors. Try H.264 instead of H.265/H.265+.
- Network instability or insufficient bandwidth. VLC may stutter, buffer, freeze, or disconnect. Try reducing bitrate, resolution, or frame rate.
- UDP transport issues. If VLC connects but video does not play reliably, try forcing RTSP over TCP in VLC settings.
Stream security
If the camera allows creating multiple users, it's a good idea to have a "view-only" user limited to the stream. As the password of this user might be used in the Vision Node settings, the admin user should not be used except for debugging login issues.
Network Issues
Wired networks are far more stable. Avoid wireless solutions if possible.
Enough bandwidth has to be reserved for the video streams. You can use a freely available Bandwidth Calculator to calculate required bandwidth.
Physical and logical separation matter: If the Vision Node PC is on a separate physical network or VLAN, or has to traverse routers, firewalls or go through a VPN, this can introduce network issues.
Network problems do not always appear as a simple connection failure. Often, the stream opens but the video quality or stability becomes unreliable. Common symptoms include:
-
Video freezes, then jumps forward
- The stream temporarily stops receiving enough data, then catches up when packets arrive again.
- Common network causes:
- Insufficient bandwidth.
- Wi-Fi interference or weak signal.
- Congested switches, routers, or VPN links.
- Other devices using the same network heavily.
-
Stuttering or uneven playback
- Motion appears irregular even though the camera is still connected.
- Common network causes:
- High latency or unstable latency.
- Packet loss.
- Overloaded network equipment.
- Wireless cameras switching between good and poor signal quality.
-
Blocky image, pixelation, or corrupted frames
- Parts of the image appear as large blocks, smear, or briefly show visual corruption.
- Common network causes:
- Packet loss, especially with RTSP over UDP.
- Weak Wi-Fi or noisy wireless environments.
- Network congestion causing dropped packets.
- Bitrate set too high for the available network capacity.
-
Stream disconnects or fails to reconnect
- The video stops completely, and VLC or the receiving system loses the stream.
- Common network causes:
- Camera is temporarily unreachable.
- IP address conflicts or DHCP address changes.
- Firewall, router, VPN, or VLAN routing problems.
- Unstable power or PoE is causing the camera or network port to reset.